How to Fix a Loose Door Knob
Understanding the Issue
Loose door knobs or handles present a common inconvenience in both residential and commercial settings. This issue typically arises due to prolonged use and various environmental factors. Over time, the constant turning and pulling of the door handle can cause wear and tear on the internal mechanisms, leading to a loosening of the handle's grip on the door. Additionally, the accumulation of dirt, dust, and other debris within the handle assembly can exacerbate the problem by hindering smooth operation and causing further deterioration of components.
Furthermore, loose or missing screws in the door plate can contribute to instability, allowing the handle to wobble or detach from the door altogether. Another potential cause of a loose door knob is a malfunctioning locking mechanism, which may result in excessive movement or difficulty in turning the knob. Understanding these underlying causes is crucial for effectively addressing the issue and implementing appropriate repair measures. By recognizing the factors contributing to the loosening of door knobs or handles, homeowners and businesses can take proactive steps to restore functionality and enhance security.
Read more about Open a frozen car door!
Types of Door Knobs
When it comes to fixing a loose door knob, understanding the type of door knob you're dealing with is essential. Two common types include the Exposed Set-Screw Doorknob and the Hidden Screw Door Knob.
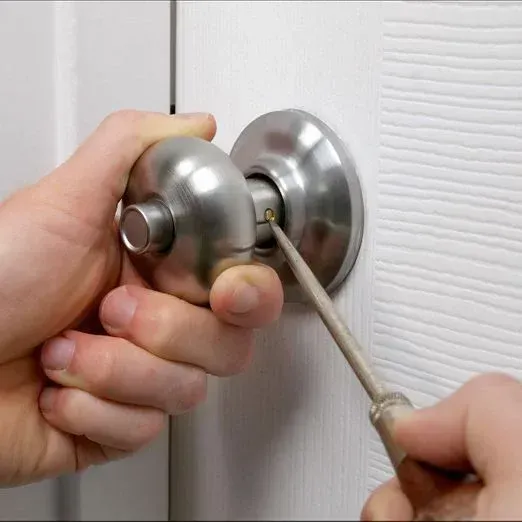
Exposed Set-Screw Doorknob
Exposed set-screw doorknobs are a traditional and widely used type of door knob. They feature set screws that are visible on the interior side of the door, typically located on the collar of the knob. These set screws secure the knob to a threaded spindle, which connects the two halves of the handle assembly.
To tighten a loose exposed set-screw doorknob, start by locating the set screw using a screwdriver or Allen key. Loosen the set screw to remove the handle, exposing the threaded spindle. Adjust the handle position on the spindle to ensure proper alignment and functionality, then tighten the set screw to secure the handle in place. This type of knob allows for easy access to the internal mechanism, simplifying the repair process.
Hidden Screw Door Knob
Hidden screw door knobs utilize a different fastening method compared to exposed set-screw knobs. Instead of visible set screws, hidden screw knobs feature concealed screws that secure the knob to the door. These screws are typically located beneath a cosmetic face plate or cover, making them less accessible for adjustment.
To address a loose hidden screw door knob, you'll first need to locate the release mechanism for the cover plate. This may involve removing a small notch or accessing a release button on the interior side of the knob. Once the cover plate is removed, you can access the screws securing the knob assembly to the door. Tighten these screws to restore stability to the door knob.
While hidden screw door knobs offer a sleek and streamlined appearance, they may require more effort to access and adjust compared to exposed set-screw knobs. However, with the right tools and techniques, addressing a loose hidden screw door knob is still a manageable task.
Read more about Door knob won't turn in and how to fix it?
Repair Steps
For Exposed Set-Screw Doorknob:
Remove the Knob or Handle:
- Begin by locating the set screw, typically situated on the interior side of the door.
- Using an appropriate tool such as a screwdriver or Allen key, loosen the set screw to detach the knob or handle from the door.
- Once loosened, carefully remove the knob or handle to access the internal components.
Remove the Base:
- With the knob or handle removed, you'll often find a base or collar attached to the door.
- Use caution and a flathead screwdriver to gently pry the base away from the door, exposing the internal mechanism.
Find the Screws and Tighten:
- After removing the base, you'll have access to the screws that secure the door knob assembly to the door.
- Use a screwdriver to tighten these screws, ensuring they are securely fastened to the door.
- Tighten each screw individually, checking for proper alignment and stability as you go.
Restore the Base and Put the Handle Back On:
- Once the screws are tightened, carefully position the base back onto the door, aligning it with the screw holes.
- Press the base firmly against the door to ensure a secure fit.
- With the base in place, reattach the knob or handle by aligning it with the spindle and tightening the set screw.
- Test the door knob to ensure it operates smoothly and securely before completing the repair process.
For Hidden Screw Door Knob:
Release Button and Remove Cover Plate:
- Begin by locating the release button or notch on the interior side of the door knob.
- Use a tool such as an awl or small screwdriver to depress the release mechanism and remove the cover plate.
- Carefully pry off the cover plate, taking care not to damage the surrounding area or paint.
Tighten Screws:
- With the cover plate removed, you'll have access to the screws that secure the door knob assembly to the door.
- Use a screwdriver to tighten these screws, ensuring they are snug and securely fastened.
- Inspect the door knob assembly as you tighten the screws, checking for proper alignment and stability.
Reassemble the Knob:
- Once the screws are tightened, position the cover plate back onto the door, aligning it with the screw holes.
- Press the cover plate firmly against the door to ensure a secure fit.
- With the cover plate in place, slide the knob or handle back onto the spindle, ensuring proper alignment.
- Depress the release button or mechanism to secure the knob in place.
- Test the door knob to ensure it operates smoothly and securely before completing the repair process.
Tools Required
To effectively repair a loose door knob, you may need the following tools:
- Screwdriver: A flathead or Phillips screwdriver is commonly used to loosen and tighten screws securing the door knob assembly.
- Allen Key: If your door knob uses set screws, an Allen key may be necessary to loosen and tighten these screws.
- Awl: An awl can be useful for depressing release buttons or accessing hidden components within the door knob assembly.
- Small Screwdriver: A small screwdriver may be needed to remove cover plates or access hidden screws in certain door knob designs.
- Pliers (Optional): In some cases, pliers may be useful for gripping and tightening screws, particularly if they are difficult to reach or turn by hand.
Identification of Door Handle Type
Identifying the type of door handle you have is crucial for determining the appropriate repair method. Here are some steps to help you identify your door handle type:
Visual Inspection:
- Examine the door knob or handle closely to determine if there are any visible screws or set screws.
- Look for screws on the collar or base of the knob that may indicate an exposed set-screw design.
- If you can see screws, it's likely an exposed set-screw door knob.
Check for Cover Plates:
- Look for cover plates on both sides of the door knob.
- If you can see screws on one side but not the other, it may be a hidden screw door knob.
Consult Documentation or Manufacturer:
- If you have documentation or manufacturer information for your door knob, refer to it for details on the design and installation.
- Manufacturer websites or product manuals may provide insights into the specific type of door knob you have.
Online Research:
- Search online for images or descriptions of different types of door knobs to compare with your own.
- Look for articles or guides that explain common door knob designs and how to identify them.
Conclusion
Repairing a loose door knob is a manageable task that can enhance both the functionality and security of your door. By identifying the type of door knob you have, gathering the necessary tools, and following the appropriate repair steps, you can effectively tighten and secure the door knob to restore its stability.
Whether your door knob utilizes an exposed set-screw or hidden screw design, the repair process typically involves removing the knob or handle, tightening screws, and reassembling the components. By taking these steps, you can address the underlying causes of the looseness and prevent future issues from arising. Regular maintenance, such as cleaning and lubricating the door knob, can help prolong its lifespan and prevent further deterioration. Additionally, promptly addressing any signs of wear or damage can prevent more significant issues from developing. If you encounter difficulties during the repair process or if the door knob continues to malfunction after attempted repairs, consider seeking professional assistance from a locksmith or hardware expert. They can provide guidance and expertise to resolve more complex issues and ensure the proper functioning of your door knob. By taking proactive measures to repair and maintain your door knob, you can ensure smooth operation and reliable security for your home or business.
Call Us Any Time!