How to Replace Sliding Patio Door Lock
So, you've been dealing with a sliding patio door lock that's just not cutting it anymore, huh? Maybe it's sticking, or perhaps it's just not providing that peace of mind you need. Trust me, I know how frustrating that can be. But don't worry, replacing your sliding patio door lock isn't as daunting as it might seem. In fact, with the right steps and a bit of guidance, you’ll have it sorted out in no time. Imagine the satisfaction of knowing your home is secure and your patio door lock works perfectly. Ready to dive in and tackle this together? Let's get started!
Read more about Right interior door locks for security needs!
Understanding Sliding Patio Door Locks
Types of Sliding Patio Door Locks
Mortise Locks
Mortise locks are installed inside the door frame, making them sleek and unobtrusive. They are known for their durability and secure fit. If your sliding door has a mortise lock, it likely sits flush with the edge of the door, providing a clean look while offering solid security.
Hook-Style Locks
Hook-style locks use a hook mechanism that latches onto a strike plate on the door frame. These locks are great for added security as the hook makes it difficult to pry the door open. You’ll find these often in patio doors that need a bit more protection against forced entry.
Loop-Style Locks
Loop-style locks feature a loop that catches onto the door frame. They are straightforward and easy to operate, making them a popular choice for many homeowners. While they might not be the most secure option, they offer decent protection for lower-risk areas.
Keyed Locks
Keyed locks provide the highest level of security among sliding patio door locks. They require a key to lock and unlock, adding an extra layer of protection. If security is your top priority, a keyed lock is an excellent choice. Plus, having a keyed lock means you can easily integrate it with your home’s overall security system.
Signs You Need to Replace Your Lock
- Difficulty Locking/Unlocking: The lock is hard to turn or doesn't engage properly.
- Visible Wear and Tear: There are noticeable cracks, rust, or damage.
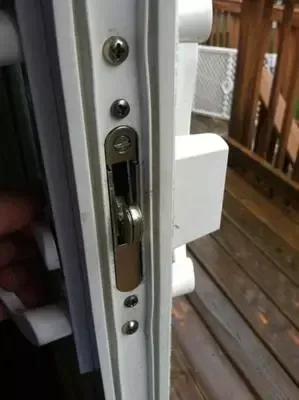
- Misalignment: The lock and strike plate don't line up correctly.
- Loose Components: Parts of the lock feel wobbly or unstable.
- Security Concerns: The lock doesn’t feel secure or reliable anymore.
- Key Problems: The key is hard to insert or remove, or it no longer works.
Tools and Materials Needed
- Essential Tools
- Screwdriver set
- Measuring tape
- Pliers
- Drill (if needed)
- Replacement Materials
- New sliding patio door lock
- Screws
- Lock lubricant
Read more about Sliding door lock solution and tips!
Preparing for Replacement
Before diving into replacing your sliding patio door lock, it’s crucial to take a few safety precautions. Make sure to wear gloves and safety glasses to protect yourself from any sharp edges or debris. Ensure the area is well-lit and free of obstructions to avoid any accidents. Next, measure the existing lock accurately to ensure you purchase the right replacement. Use a measuring tape to get the dimensions of the lock and note down the measurements. When purchasing a new lock, choose a model that is compatible with your door type and size. Look for quality brands and consider features such as durability and security level to make the best choice for your needs.
Step-by-Step Guide to Replacing a Sliding Patio Door Lock
Step 1: Remove the Old Lock
- Loosen the Screws: Using the appropriate screwdriver, remove the screws from the lock.
- Detach the Lock Mechanism: Carefully pull the lock mechanism out of the door.
- Inspect the Door: Check for any damage or debris in the lock area and clean if necessary.
Step 2: Install the New Lock
- Align the New Lock: Position the new lock in the door, ensuring it fits properly in the existing slot.
- Secure the Lock: Insert and tighten the screws to secure the new lock in place.
- Test the Lock: Make sure the lock operates smoothly and engages properly with the door frame.
Step 3: Adjust the Lock (if needed)
- Check Alignment: Ensure the lock aligns correctly with the striker plate.
- Make Necessary Adjustments: Adjust the lock position or striker plate to ensure a snug fit.
Step 4: Lubricate the Lock
- Apply Lock Lubricant: Use a suitable lock lubricant to ensure smooth operation and longevity of the new lock.
- Test Again: Operate the lock several times to distribute the lubricant evenly.
Troubleshooting Common Issues
Encountered a problem while replacing your sliding patio door lock? Don't worry; we've got you covered. Here are some common issues and how to address them:
Lock Doesn’t Align Properly
- Check the alignment of the new lock with the door frame.
- Ensure the striker plate is properly positioned and adjusted.
- Tighten any loose screws that may be causing misalignment.
Difficulty in Lock Operation
- Apply additional lubricant to the lock mechanism.
- Check for any debris or obstructions in the lock's path and clean if necessary.
- Ensure all components are securely tightened and aligned.
Lock Feels Loose
- Double-check that all screws are tightened securely.
- Consider using longer screws for a more secure fit.
- If necessary, replace any damaged or worn-out components of the lock.
Conclusion
In conclusion, replacing your sliding patio door lock is a manageable task that can greatly enhance the security and functionality of your home. By following the step-by-step guide provided here and taking necessary safety precautions, you can successfully upgrade your lock with confidence. Remember to choose a lock that fits your needs and door specifications, and don't hesitate to seek professional assistance if needed. With your new lock in place, you can enjoy peace of mind knowing that your home is better protected against intruders and that your sliding patio door operates smoothly. Don't wait any longer—take action today to improve the security of your home!
Call Us Any Time!