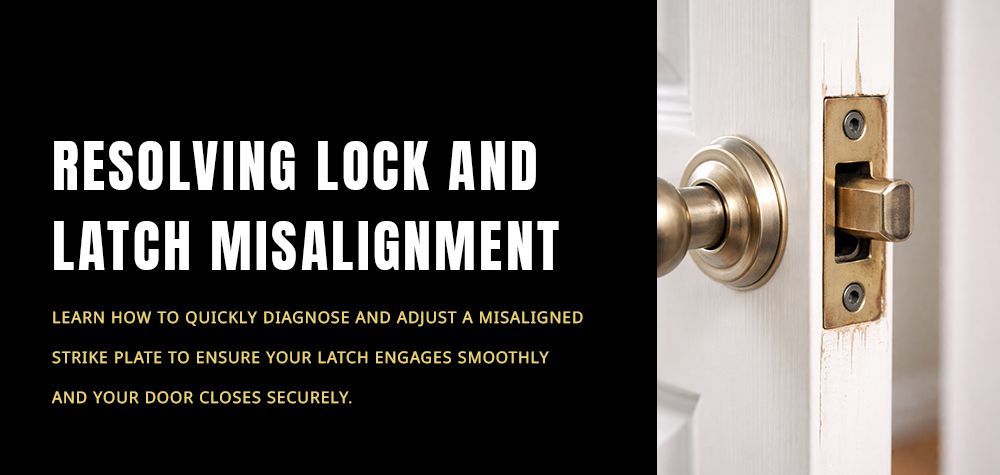
6 Simple Ways To Get A Broken Key Out Of A Lock

Youmna Rehman • Apr 25, 2024

Call Us Any Time!

24/7 Residential, Commercial & Automotive Locksmith Services

Dealing with a broken key stuck in a lock can be a frustrating experience, but fear not, as there are several effective methods for extracting it. Whether you've snapped your key while trying to unlock a door or accidentally broken it off inside a padlock, knowing how to safely remove the broken key is essential. In this guide, we'll explore six simple yet reliable techniques that can help you retrieve a broken key from a lock.


From using common household tools to specialized extractor devices, each method offers its own approach to resolving this common issue, ensuring you regain access to your lock without the need for professional assistance. Let's dive into these key extraction methods to learn how to tackle this problem with confidence and ease.


Read more about What to do when key won't turn in lock!


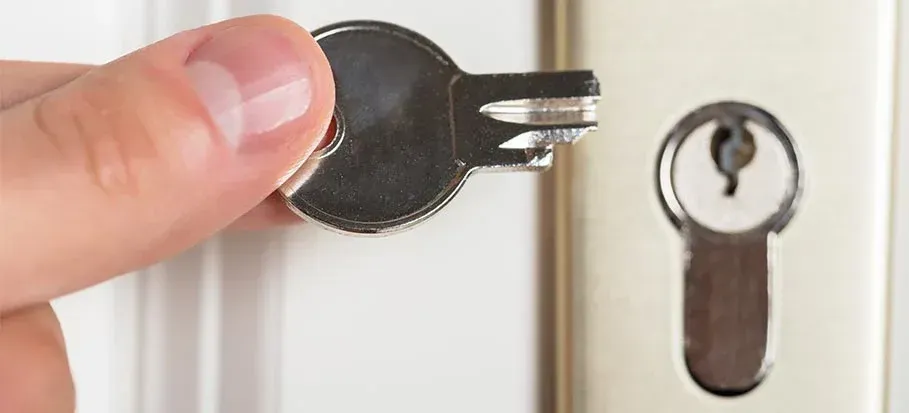
How to Remove a Broken Key from a Lock


Tweezers Method

Using tweezers is one of the most straightforward approaches to extracting a broken key from a lock. Here's how you can use this common household tool to retrieve the broken key:


  1. Select Fine-Tipped Tweezers: Begin by selecting a pair of tweezers with fine, pointed tips. These tweezers should be slim enough to fit into the keyhole and grasp onto the broken key fragment securely.
  2. Insert Tweezers into Keyhole: Carefully insert the tweezers into the keyhole, ensuring that the tips are positioned to grip the broken key fragment. Take your time and gently maneuver the tweezers to locate and grasp onto the broken piece.
  3. Gently Pull Out Key Fragment: Once you've securely grasped the broken key fragment with the tweezers, apply gentle pressure to pull it out of the lock. Be cautious not to exert too much force, as this could cause the key fragment to break further or damage the lock mechanism.
  4. Inspect for Remaining Key: After removing the broken key fragment, inspect the lock to ensure that no remaining pieces are lodged inside. Use a flashlight to illuminate the keyhole and carefully examine the interior.
  5. Test the Lock: Once you're confident that all key fragments have been removed, test the lock by inserting a spare key or the original key (if available). Ensure that the lock functions smoothly and that the key operates without any obstruction.


Broken Key Extractor Tool

A broken key extractor tool is a specialized device designed specifically for removing broken keys from locks. Here's how to use this professional solution effectively:


  1. Select the Right Extractor Tool: Broken key extractor tools come in various sizes and designs to accommodate different types of locks and key fragments. Choose an extractor tool that matches the size and shape of the broken key fragment you need to remove.
  2. Insert Extractor into Keyhole: Insert the extractor tool into the keyhole alongside the broken key fragment. Ensure that the extractor's serrated edge is facing toward the key fragment for optimal grip.
  3. Engage Extractor's Gripping Mechanism: Once the extractor is inserted into the keyhole, gently rotate it to engage its gripping mechanism with the broken key fragment. The serrated edge of the extractor should catch onto the key fragment securely.
  4. Apply Gentle Pressure: With the extractor securely engaged with the broken key fragment, apply gentle pressure to pull the key fragment out of the lock. Use slow and steady movements to avoid further damaging the lock or causing the key fragment to break further.
  5. Inspect and Test the Lock: After successfully removing the broken key fragment, inspect the lock's keyhole to ensure that no remaining pieces are lodged inside. Test the lock with a spare key or the original key (if available) to verify that it functions smoothly without any obstruction


Read here about Types of locks and their application!


Jigsaw Blade Technique

The jigsaw blade technique is a creative DIY method for removing a broken key from a lock using a common household tool. Here's how to use this technique effectively:


  1. Select a Thin Jigsaw Blade: Choose a thin jigsaw blade that is narrow enough to fit into the keyhole alongside the broken key fragment. The blade should be flexible and sturdy enough to withstand the extraction process.
  2. Insert the Blade into the Keyhole: Carefully insert the jigsaw blade into the keyhole, positioning it alongside the broken key fragment. Ensure that the blade is inserted far enough to reach the base of the key fragment.
  3. Apply Pressure and Wiggle: Once the blade is inserted, apply gentle pressure while simultaneously wiggling it back and forth. The goal is to maneuver the blade in a way that hooks onto the broken key fragment and allows you to pull it out.
  4. Slow and Steady Movements: Use slow and steady movements to avoid causing further damage to the lock or pushing the broken key fragment deeper into the mechanism. Patience is key, as it may take some time to dislodge the key fragment.
  5. Remove the Key Fragment: As you wiggle the jigsaw blade, you should feel it hook onto the broken key fragment. Once you have a firm grip, carefully pull the blade out of the keyhole, bringing the key fragment with it.
  6. Inspect and Test the Lock: After successfully removing the broken key fragment, inspect the lock's keyhole to ensure that no remaining pieces are lodged inside. Test the lock with a spare key or the original key (if available) to verify that it functions smoothly without any obstruction.


Read more about Door knob won't turn in and how to fix it!

Super Glue Method

The super glue method is a simple yet effective way to extract a broken key from a lock using household adhesive. Here's how to use this technique:


  1. Gather Supplies: You'll need a small amount of super glue and a thin, stiff object such as a toothpick or paperclip.
  2. Apply Super Glue: Carefully apply a small drop of super glue to the end of the toothpick or paperclip.
  3. Attach to Broken Key: Press the glue-coated end of the toothpick or paperclip onto the broken end of the key stuck in the lock. Hold it in place firmly for a few seconds to ensure a strong bond.
  4. Allow Glue to Set: Give the super glue some time to set and bond with the broken key fragment. This usually takes a few minutes.
  5. Gently Pull Out Key: Once the glue has set, slowly and carefully pull the toothpick or paperclip, along with the attached broken key fragment, out of the lock. Apply steady, even pressure to avoid breaking the key further or damaging the lock.
  6. Inspect and Test: After removing the broken key fragment, inspect the lock's keyway to ensure no residual glue or key fragments remain. Test the lock with a spare key or the original key (if available) to verify that it functions smoothly without obstruction.


Read more about Open multiple locks with single key!


Tapping the Cylinder Technique

The tapping the cylinder technique involves using gentle tapping or vibration to dislodge the broken key fragment from the lock's internal components. Here's how to use this method effectively:


  1. Prepare the Area: Ensure you have a clear workspace around the lock. Position yourself comfortably and have a small hammer or similar tool on hand.
  2. Apply Tapping Pressure: With the broken key fragment still lodged in the lock, lightly tap the outer surface of the keyway or the side of the lock cylinder with the hammer. Alternatively, you can use a screwdriver handle or a rubber mallet for softer tapping.
  3. Vary the Pressure: Start with gentle taps and gradually increase the pressure if the key fragment doesn't dislodge. Be careful not to apply excessive force, as this could damage the lock mechanism.
  4. Use Vibration: In addition to tapping, you can also try applying vibration to the lock by gently shaking it or using a vibrating tool. The vibrations may help loosen the key fragment and allow it to fall out of the lock.
  5. Remove the Key Fragment: After tapping and vibrating the lock for a few moments, check to see if the broken key fragment has dislodged. If it hasn't, repeat the process, adjusting the pressure and angle as needed until the key fragment loosens and can be easily removed.
  6. Inspect and Test: Once you've successfully removed the broken key fragment, inspect the lock's keyway to ensure no residual debris remains. Test the lock with a spare key or the original key (if available) to verify that it functions smoothly without obstruction.


Probe and Pull Method

The probe and pull method involves using a small, slender tool to probe the keyway and carefully maneuver the broken key fragment out of the lock. Here's how to use this method effectively:


  1. Gather Your Tools: Before starting, gather a thin, sturdy tool such as a small screwdriver, a thin piece of wire, or a specially designed broken key extractor tool.
  2. Insert the Probe: Insert the probe tool into the keyway alongside the broken key fragment. Be gentle to avoid pushing the fragment further into the lock.
  3. Maneuver the Fragment: Once the probe is inserted, carefully maneuver it around the broken key fragment. Try to hook or catch onto the fragment with the tip of the probe.
  4. Apply Gentle Pressure: With the probe hooked onto the key fragment, apply gentle pressure to pull the fragment out of the lock. Use steady, controlled movements to avoid breaking the key further or damaging the lock mechanism.
  5. Rotate if Necessary: If the broken key fragment is stuck or wedged tightly in the lock, try rotating the probe slightly to create more leverage. This may help loosen the fragment and facilitate its removal.
  6. Remove the Fragment: Continue maneuvering and pulling with the probe until the broken key fragment is completely removed from the lock. Be patient and take your time to avoid causing damage to the lock.
  7. Inspect and Test: After successfully removing the key fragment, inspect the lock's keyway to ensure no residual debris remains. Test the lock with a spare key or the original key (if available) to verify that it functions smoothly without obstruction.


Conclusion

In conclusion, dealing with a broken key in a lock can be a frustrating experience, but with the right techniques and tools, it's possible to resolve the issue effectively. From using tweezers and broken key extractor tools to employing methods like the jigsaw blade, super glue, tapping the cylinder, and the probe and pull technique, there are several options available depending on the situation.


However, it's essential to approach the task with caution and patience to avoid causing further damage to the lock. By following these simple methods and steps outlined above, you can safely extract a broken key from a lock and restore its functionality. If unsure or unable to handle the situation yourself, it's advisable to seek professional assistance from a locksmith to avoid potential damage to the lock or keyway.

By Youmna Rehman 16 May, 2024
Navigating an eviction lockout can be an emotionally charged and challenging experience for both landlords and tenants. As tensions escalate, having a professional and neutral party, such as an eviction locksmith, can be invaluable in handling the practical aspects of the process. In situations where law enforcement is involved, such as sheriff eviction lockouts, the presence of a locksmith may be necessary or requested. This introduction will explore the crucial role of eviction locksmiths and outline the essential services they provide to facilitate a smooth transition during the eviction process. Read more about The Ultimate Guide to Finding a Reliable Locksmith in Phoenix, Arizona! Understanding Eviction Lockout Services Eviction lockout services encompass a range of crucial tasks aimed at restoring access and security to a property following a tenant eviction. These services are essential for ensuring a smooth transition and safeguarding the property against unauthorized entry. The following sections will delve into the key aspects of eviction lockout services: A. Property Access Ensuring access to the property is fundamental during an eviction lockout, particularly in cases where law enforcement is involved. Eviction locksmiths play a vital role in assisting landlords by opening doors when keys are unavailable or when locks have been changed by the tenant. B. Lock Change One of the primary tasks of an eviction locksmith is to change the locks on the property. This step is crucial for preventing former tenants from re-entering the premises using their old keys. Lock changes enhance security and provide peace of mind to landlords and new occupants. C. Rekey Locks In some situations, rather than replacing the entire lock, rekeying may be a viable option. Rekeying involves altering the internal mechanism of the lock so that it can be operated by a new key. This cost-effective solution maintains security while eliminating the need for lock replacement. D. Mailbox Change Securing the mailbox is essential to protect sensitive mail and parcels from unauthorized access, especially in multi-unit properties. Eviction locksmiths can replace mailbox locks to ensure that only authorized individuals have access to the incoming mail. E. Padlock Removal Padlocks may pose a challenge during eviction lockouts, particularly if the previous tenant has left them in place or if they are used to restrict access to the property. Eviction locksmiths are equipped to remove padlocks using appropriate tools and techniques, facilitating seamless access to the premises. Residential vs. Commercial Eviction Locksmiths The distinction between residential and commercial eviction locksmiths lies in the unique considerations and requirements associated with each type of property. Understanding these differences is essential for landlords seeking eviction locksmith services tailored to their specific needs. This section will explore the key contrasts between residential and commercial eviction locksmiths: A. Residential Eviction Locksmiths Residential eviction locksmiths specialize in handling eviction lockouts for residential properties, such as single-family homes, apartments, and condominiums. Key aspects include: Considerations for Residential Properties: Dealing with a variety of locks commonly found in residential settings, including deadbolts, keyed door knobs, and chain locks. Addressing potential vulnerabilities and security concerns unique to residential premises, such as access points through windows or back doors. Risks and Additional Costs: Facing potential risks of volatile evictions, including threats or physical harm from disgruntled tenants. Some locksmiths may charge additional fees for sheriff-assisted eviction lockouts due to the heightened risks and complexities involved. B. Commercial Eviction Locksmiths Commercial eviction locksmiths specialize in eviction lockouts for commercial properties, including office buildings, retail spaces, and industrial facilities. Key aspects include: Considerations for Commercial Properties: Understanding the complexities of physical access control systems commonly found in commercial settings, such as master key systems and electronic locks. Assessing and addressing specific security needs, such as safeguarding valuable assets and sensitive information. Dealing with Complex Systems: Handling the intricacies of integrated building security, which may involve coordinating lock changes with existing access control systems. Providing recommendations for high-security solutions tailored to the unique requirements of commercial establishments.
By Youmna Rehman 15 May, 2024
Discover innovative ways to secure your closet door without a lock using everyday items and specialized devices. Enhance privacy and prevent unauthorized access with makeshift solutions like fork jams, door jammers, and portable locks.
By Youmna Rehman 13 May, 2024
Explore the techniques used to bypass lockbox security and learn how to fortify defenses against unauthorized access. Discover methods such as picking, shimming, and drilling, and find expert tips to enhance lockbox security.
By Youmna Rehman 10 May, 2024
Discover the key components and benefits of lockboxes while understanding common bypassing methods and locksmith advice for maximizing security. Safeguard your assets effectively with secure lockbox solutions.
By Youmna Rehman 09 May, 2024
Ensuring the security of your home or office starts with a properly functioning door lock. Mortise locks, known for their durability and reliability, are commonly found in many residential and commercial properties. However, over time, these locks may wear out or become damaged, necessitating replacement. In this comprehensive guide, we'll walk you through the step-by-step process of replacing a mortise lock. From gathering the necessary tools and materials to testing and adjusting the new lock, each stage is carefully outlined to help you successfully upgrade your door security in just a few simple steps. Whether you're a DIY enthusiast or a first-time homeowner, this guide provides the expertise you need to tackle this project with confidence. Here you can read Types of Deadbolts and How to Choose the Right one! Gather Necessary Tools and Materials for Mortise Lock Replacement Before you begin the process of replacing a mortise lock, it's essential to gather all the necessary tools and materials. Having everything on hand will streamline the installation process and ensure a smoother experience. Here's what you'll need: Tools: Screwdriver Set : Phillips and flathead screwdrivers of various sizes will be required for removing screws and disassembling the old lock. Pliers : Both needle-nose and standard pliers can come in handy for gripping and manipulating small components. Hammer : A hammer may be needed for gently tapping the chisel during the preparation phase. Chisel : A sharp chisel will be necessary for removing any excess wood or adjusting the mortise pocket to accommodate the new lock. Drill (Optional) : Depending on the condition of the existing mortise pocket, you may need a drill to make adjustments or create pilot holes for screws. Materials: New Mortise Lockset : Purchase a high-quality mortise lockset that matches the dimensions and style of your existing lock. Screws : Ensure you have the appropriate screws for securing the new lockset to the door. If the provided screws are insufficient or mismatched, you may need to purchase additional ones. Wood Filler : In case there are any gaps or holes left behind by the old lock, wood filler can be used to fill and smooth out the surface for a seamless installation. Removing the Old Mortise Lock Before installing a new mortise lock, it's crucial to remove the old one carefully. Follow these steps to ensure a smooth removal process: 1. Gather Your Tools Ensure you have the necessary tools ready, including screwdrivers (both Phillips and flathead), pliers, and a hammer. 2. Unscrew the Exterior Trim Use a screwdriver to remove the screws securing the exterior trim or faceplate of the mortise lock. Keep the screws in a safe place, as you may need them later. 3. Disconnect Interior Components Carefully detach the screws holding the interior trim or faceplate in place. Once the screws are removed, set the interior trim aside. 4. Remove the Lock Body Locate and unscrew the screws holding the mortise lock body to the door. Depending on the lock design, there may be screws on both the edge and face of the door. With the screws removed, gently pull the lock body out of the door. 5. Clean the Mortise Pocket Take a moment to inspect the mortise pocket in the door. Remove any debris or buildup to ensure a clean surface for installing the new lock. 6. Dispose of the Old Lock Properly dispose of the old mortise lock and any associated hardware that is no longer needed. Preparing the Door for Mortise Lock Installation Before installing the new mortise lock, it's crucial to prepare the door to ensure a proper fit and smooth operation. Follow these steps to prepare the door for installation: 1. Measure and Adjust the Mortise Pocket Measure the dimensions of the mortise pocket to ensure it matches the size of the new lock. If necessary, use a chisel to adjust the mortise pocket, making it deeper or wider as needed to accommodate the new lock. 2. Clean the Mortise Pocket and Surrounding Area Remove any debris or dust from the mortise pocket and surrounding area using a vacuum cleaner or brush. Wipe down the surface with a clean, damp cloth to ensure it's free of any dirt or residue. 3. Check for Smooth Operation Test the door's operation to ensure it opens and closes smoothly without any obstructions. If the door sticks or binds, use a plane or sandpaper to carefully remove excess material from the edges. 4. Fill Any Gaps or Holes Inspect the door for any gaps or holes left behind by the old lock. Use wood filler to fill any gaps or holes, smoothing the surface with a putty knife. Allow the wood filler to dry completely before proceeding to the next step. 5. Verify Alignment of Strike Plate Check the alignment of the strike plate on the door frame to ensure it aligns properly with the latch of the new lock. Make any necessary adjustments to the strike plate position to ensure a snug fit with the latch. 6. Lubricate Hinges and Moving Parts Apply a lubricant to the hinges and other moving parts of the door to ensure smooth operation. Use a silicone-based lubricant or graphite powder for best results. 
By Youmna Rehman 07 May, 2024
Discover seven reliable methods to unlock your car trunk without a key, including the slim jim technique, coat hanger method, key fob signal amplification, locksmith assistance, and more. Explore step-by-step instructions for each method and regain access to your trunk with ease.
By Youmna Rehman 06 May, 2024
Discover the must-have tools for your car lockout kit, including slim jims, lock picks, air wedges, long reach tools, and key extractor kits. Learn how to use these tools safely and effectively to handle lock-related emergencies with confidence.
By Youmna Rehman 04 May, 2024
Discover everything you need to know about lock snapping in 2024. Learn how burglars exploit vulnerable locks, the best anti-snap lock standards, and how locksmiths can help protect your home.
More Posts
Share by: